


July 11, 2022
The article aims to give you a practical demonstration of Hyvä Theme development: how to create a Hyvä compatibility module. I highly suggest you read the official documentation on Hyvä Compat modules here https://docs.hyva.io/hyva-themes/compatibility-modules/index.html before starting your own.
What is a Hyvä Compat module?
A compat module is installed and used to override a 3rd party module's template and frontend files, something not fully supported out of the box in Magento 2's theme fallback system.
By following a naming convention based on the original module, the Hyvä compat module will first check a compat module for a frontend view file before falling back to the original modules files, similar to the Magento theme fallback. You'll find the Hyvä module in the vendor folder that is responsible for this.
Mirasvit Magento 2 Promo Banners module
The module we’re going to be making Hyvä Compatible is the Mirasvit Magento 2 Promo Banners module.
https://mirasvit.com/magento-2-promo-banners.html
Adding a test Rotator banner and a Popup banner the final result will look something like this.

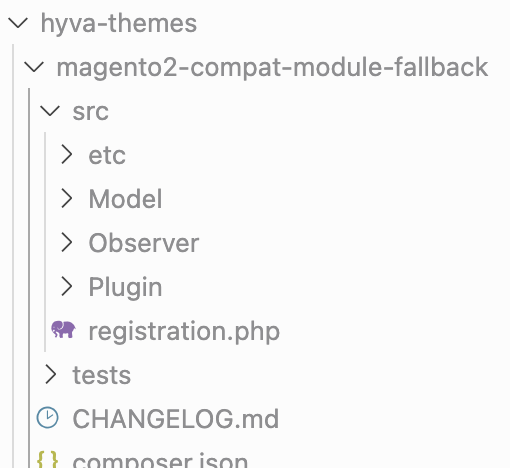
Installing the Skeleton Compatibility module.
The Skeleton Compat module from the Hyvä composer repository requires the original banner module to be loaded via Composer. I initially had this module in the app/code folder so Composer complains that the required dependency was not found.
To get around this, clone the repository from a local folder with composer. Full instructions on how todo that can be found here :
https://docs.hyva.io/hyva-themes/compatibility-modules/clone-the-repository.html
A quick overview of the process;
- Copy the module to a folder called `local-src`
- run `composer config repositories.local-src path 'local-src/*'`
- `composer install`
- `composer require hyva-themes/magento2-mirasvit-banner`
The original banner module is loaded via composer now and the skeleton Compat module will install correctly as the mirasvit-banner module dependency has now been resolved.
Reviewing the original module code
The first step is to look at the source code of the original module when making a Hyvä module, the focus of your effort will be on the module's view/frontend folders.
Expanding these folders shows how many files may require work to make them Hyvä compatible.

This may look like a lot but most of these are very small files and some can be ignored. For the initial version of this Compat module I do not need the debug functionality. So I will ignore any of these files for now.
The first files to review are the layout files, it’s important to understand the way that Hyvä has removed a large set of default Magento layout positions.
This Banner module's layout files only uses the ‘before.body.end’ position, this is still supported in Hyvä so there are no changes required in the layout files.
Next I’ll review the templates phtml files, these do contain multiple instances of requireJS and Luma based JS code. So these will need to be rewritten to be made compatible with Hyvä.
The kind of code that will no longer work includes,
Loader.phtml
<?php
/** @var \Mirasvit\Banner\Block\Loader $block */
?>
<script type="text/x-magento-init">
<?= \Zend_Json::encode($block->getJsConfig()) ?>
</script>placeholder.phtml
<script type="text/x-magento-init"><?= \Zend_Json::encode([

    '[data-banner-renderer="' . $placeholder->getId() . '"]' => [

        'Mirasvit_Banner/js/placeholder/popup-renderer' => [

            \Mirasvit\Banner\Api\Data\PlaceholderInterface::ID => $placeholder->getId(),

        ],

    ],

  ]) ?></script>
The <script> element's text/x-magento-init type indicates that it's a Luma based JS script, this is a non-standard script type that is ignored by the browser usually, so when it’s output in a Hyvä theme without the supporting Luma code then nothing will happen.
So we now have to understand what the code is intended to do and replace it with a compatible JS version.
Converting the Luma JS
Loader.phtml
<?php
/** @var \Mirasvit\Banner\Block\Loader $block */
?>
<script type="text/x-magento-init">
<?= \Zend_Json::encode($block->getJsConfig()) ?>
</script>
The important part of this script is understanding what the getJsConfig() function outputs, so lets’ review that code.

So this is responsible for outputting 2 requireJS components. One for the Loader and the other for the Analytics component.
RequireJS loads modules based on the key, and will pass the array value data to the initialisation of the requireJS module. So taking the first component `Mirasvit_Banner/js/loader` let’s have a look at the code for this,
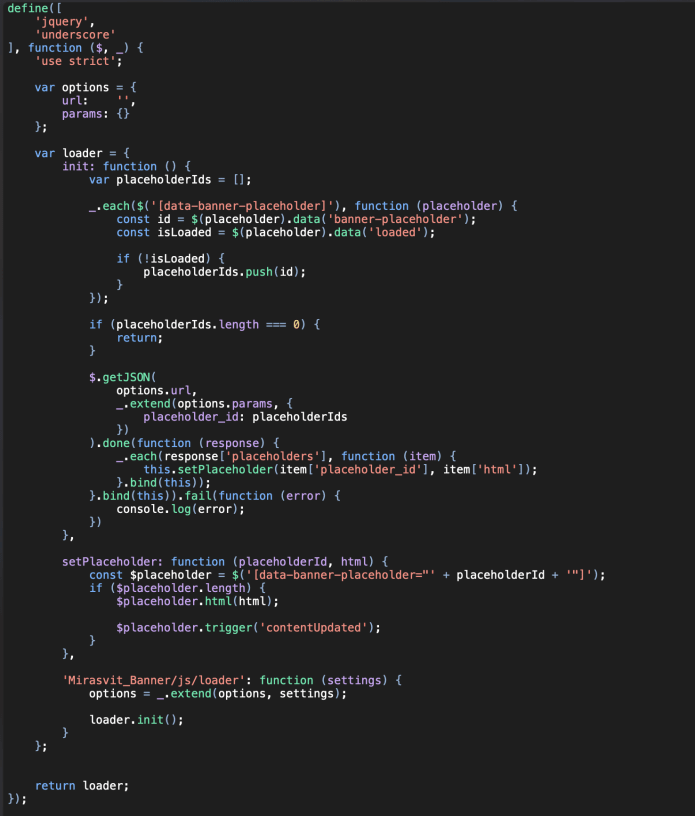
This RequireJS module encapsulates the code for the placeholder loader, the function defined by the module key “Mirasvit_Banner/js/loader” will be called and the options passed in via the settings.
The settings will be passed in when the requireJs loader initialises the module with the data passed in from this value,

Removing RequireJs modules
So our first job is to replicate this encapsulation with an IIFE (Immediately Invoked Function Expression), this is a JavaScript function that runs as soon as it is defined with local variables scoped inside its initial function scope.
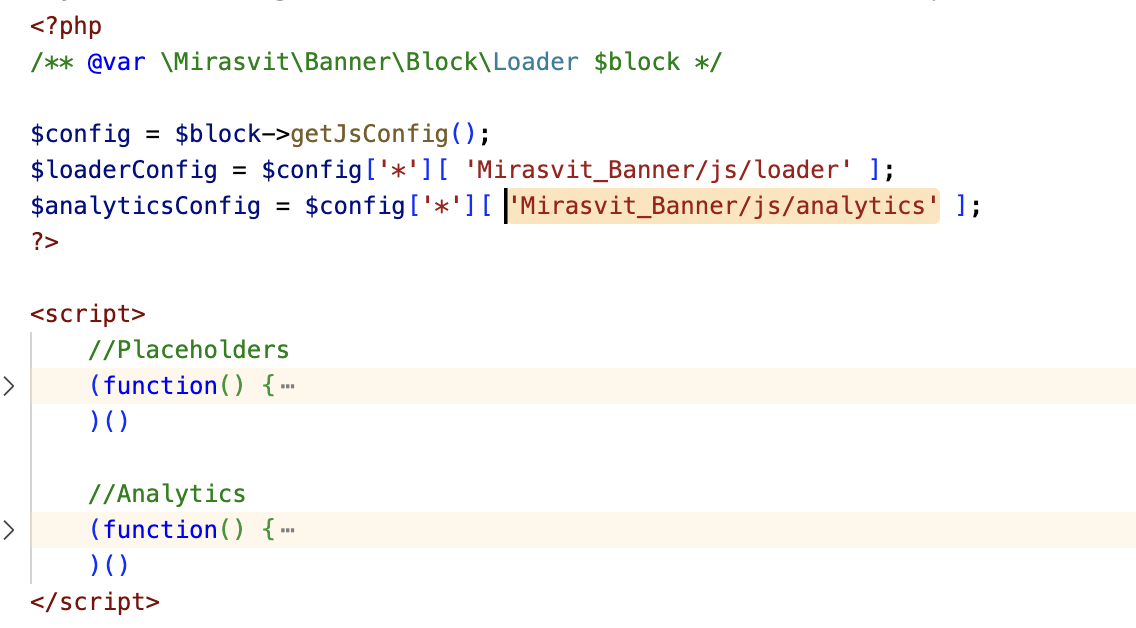
Rather than outputting the return data from the getJSConfig() function we’ll store it in a variable so that we can access the data as needed in our JS code. Next we’ll extract the loader Configuration data that was returned.
<?php
$config = $block->getJsConfig();
$loaderConfig = $config['*'][ 'Mirasvit_Banner/js/loader' ];
Then we’ll output the IIFE and re-rewrite the module to run as native JS, keeping to the Hyvä principles we’ll not include unnecessary JavaScript libraries, for functionality that can now be written in native vanilla JS.
<script>
   //Placeholders
   (function() {
     // Code goes here
   )()
The first part of the module’s initial function is responsible for finding all elements with a data attribute of `data-banner-placeholder`, and checking to see if each element has a loaded data attribute. An array of elements is then created to keep track of ones that haven't been loaded.
_.each($('[data-banner-placeholder]'), function (placeholder) {
    const id = $(placeholder).data('banner-placeholder');
    const isLoaded = $(placeholder).data('loaded');
    if (!isLoaded) {
        placeholderIds.push(id);
    }
});
This code uses both the Underscore library and the JQuery library. As these are not available in Hyvä we’ll rewrite this as,
let placeholderIds = [];
const placeholders = document.querySelectorAll('[data-banner-placeholder]');
for (let placeholder of placeholders) {
    const id = placeholder.dataset.bannerPlaceholder
    if (!placeholder.dataset.loaded || placeholder.dataset.loaded !=1) {
        placeholderIds.push(id);
    }
}
The next part of the code uses jQuery's getJSON() function, this can be replaced with the natively supported more modern fetch() function.
Please be aware that this is not supported by IE, but as IE is officially dead as of June 15, 2022 you should be good to use it.
let paramStr = getParamStr(placeholderIds);
let myRequest = new Request('<?php echo $loaderConfig['url'];?>?' + paramStr);
fetch(myRequest)
    .then(response => response.json())
    .then(data => {
         for (const placeholder of data.placeholders) {
             this.setPlaceholderHtml(placeholder.placeholder_id, placeholder.html);
         }
     })
  .catch(console.error);
In the original requireJS module version the settings were available inside the component code as the `options` value, so the URL for the placeholder was accessed via options.url.
As we do not have that available, we’re outputting this value directly from the PHP variable
<?php echo $loaderConfig['url'];?>Once this component is complete we’ll then do the same for the 'Mirasvit_Banner/js/analytics' module.
After this we should have two IIFE’s that replicate the requireJS version without any jQuery or other libraries required.
Minimising the code for readability, the final output will look something like this.
As you can see this file is now a lot larger than the original but we’ve completely removed the need to use Magento’s Js, RequireJs, jQuery & Underscore libraries, speeding up page load considerably.
We do the same process to the popupRenderer.phtml which is the script responsible for opening the popup and storing locally if the popup has been shown in a cookie.
Replacing the Less based CSS
The final task is to convert the modules Less based css to Tailwind, in Hyvä the Luma based Less CSS files are completely ignored, so we need to style the templates again.
To start this task I use this great tool for converting the Less styles to tailwind classes. There are limitations to the tool and it can’t convert everything. But it’s a great start and handles the majority of basic style rules.
https://tailwind-converter.netlify.app/
The Less styles for the popup box were,
.mstBanner-placeholder__popupRenderer {
        background: #fff;
        border-radius: .4rem;
        box-sizing: border-box;
        position: fixed;
        bottom: 1rem;
        right: -100%;
        z-index: 10000000;
        box-shadow: 0 0 2rem 0 rgba(0, 0, 0, 0.4);
        overflow: hidden;
        transition: right 1.5s;
        max-width: 40rem;
}
This is converted to Tailwind classes as
class="mstBanner-placeholder__popupRenderer bg-white rounded-md box-border fixed overflow-hidden shadow z-50 max-w-md transition duration-700 ease-in-out right-full bottom-10"Another tool that is useful is this colour converter, it takes the Hex value and gives you the exact or nearest Tailwind colour name,
https://tailwind-color-finder.vercel.app
Once all JS and CSS has been converted it’s then ready for committing to the Hyva Compatible module repo. This allows anyone else to make use of this code and not require them to complete all of this effect.
Final Compat module here
https://gitlab.hyva.io/hyva-themes/hyva-compat/magento2-mirasvit-banner
Feel free to contact the team of devs here at Develo to learn more about Hyva and Magento development.
Last updated: March 12, 2025