


May 30, 2017
There are some great tools out there you can use to speed up your development workflow. The InfyOm Laravel Generator is one such tool; in a few simple commands it will create the files you needed for fully working CRUD, APIs, Test Cases and Swagger Documentation.
The generator can automatically create the following:
- Migrations
- Models
- Blade views for creating and updating data
- Repository
- Forms
That sounds pretty cool, so now I guess you’re all like “yo I wanna put this in mine how do I do it?”.
Well then, let’s go through this tutorial and find out how.
Pre-Requisites
Setting up Laravel and InfyOm are beyond the scope of this article , The Laravel and InfyOm docs will tell you everything you need to know about those
Note that this tutorial does assume that you are using Laravel version 5.4, so creating a project based on that version is advised.
Generating a scaffold for the events table
We’re going to use an Events table as an example with a separate Event type table which will highlight relations and how tables are automatically joined.
Put all that stuff together, and you’ll have a list of scheduled events with a drop-down menu on top to filter the ones that are displayed based on the event type.
So now that the context is all clear, let’s get on with the actual tutorial.
First call to action is generating the scaffold for the events table; and to do that, we get ourselves in our terminal window, inside the project folder root, and we run the command
php artisan infyom:scaffold , followed by the name of our model. So in this case, we’ll type in
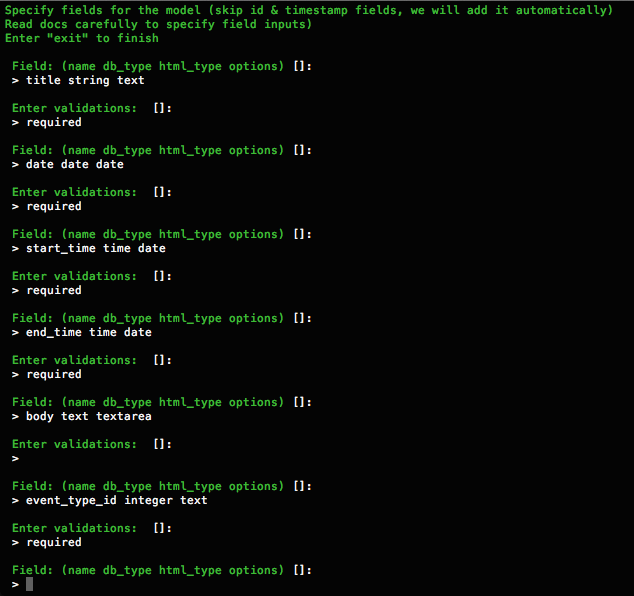
php artisan infyom:scaffold Event , after which you’re going to be presented with some text. Specifically, this text will be asking for you to specify the fields that we’ll have for each column. Namely, the fields being ‘name’, ‘db_type’, ‘html_type’, and ‘options’. I’ll explain this, don’t worry.

-
name is used to define, quite simply, the name of the column in the table. This is recommended to be typed in snake case (like_this).
- db_type is the thing we use to say what data type the column is, in the database, such as string, integer, text, etc.
- HTML_type is for defining the type of field that will be used on the form to input data into this field. So like the db_type, we just define the data type to be used here, such as text, textarea, email, password, etc. The full guide for HTML form data types can be found here.
-
options is what you use when you want to apply a specific option to a field. The options are:
- s – to specify that the field will be non-searchable
- f – to specify that the field will be non-fillable
- if – to prevent the field from being displayed in the form
- ii – to prevent the field from being displayed in the table in the index view.
The first column we’ll have in our events table is the title of the event. So for this, we define the fields that it’s asking us to input. First we type the name of the column, which, in our case, is simply ‘title’. Then we have to specify a db_type. For this one, the type will be ‘string’, as it will be just a normal text value. And then we specify the html_type. And what we want is simply a text field to input the text data. So in that case, the HTML type should be ‘text’.
The final field, options, is coincidentally optional, so we’ll leave that out because none of the 4 options defined above apply/are required for the thing we’re doing.
So, now that we’ve decided what will go in each of the fields, we just type the data for each one, separated by a space; we just need to type the command title string text to do all that, and press enter.

Then you’re presented with more text that asks you to “enter validations:”, and what it’s essentially asking you for is to specify what you want to check for before inputting the data. Examples include the length of the text entered, whether the data in this field is required, whether an email is valid, etc.
The validation we’re going to use is
required to essentially say that the form input will not go through unless this title field is filled out, as a title for an event is something that you’d expect to be required.

After pressing enter on the validation, you’re asked to enter data into the fields for the next column. For this next one, we will do a column for the event date. So, like before, we type the name of the field, the data type, and the HTML form type. Let’s just call this one ‘date’, because that just makes sense.
Now onto the database and HTML types. In this case, because this is a field for the date, the data type will be ‘date’, and the HTML type will be ‘date’. So that the data in the table can be sorted by date, inserted into a calendar, and so on, as well as making it so that the field for inputting the date will have an input mask separated by date/month/year.
So to do this, we’ll type
date date date , making you sound like a broken record, but trust me, we’re calling the field date, the data type is date, and the field’s HTML type is date.
After pressing enter, you’ll be presented with the same “enter validations” message as before, and this time, we’ll also type required because this field will also be required. I mean, we’re talking about a date column on a scheduled events table, it’s pretty much essential.
So, once you press enter on that, the cycle repeats and we’re back to inputting another field. So, as you can guess, this cycle just repeats for the rest of the fields, which will include fields for the start time and end time, which will both be of the database type of time, and of the HTML type of date, and are both required.
We’ll also have a field for the body text of the event, which will be the database type of ‘text’, and a HTML type of ‘textarea’; the difference with this field is that it won’t be required, so what you’ll need to do is press enter on the required field without typing anything.
The final field in the table is the event_type_id field, which will be used to specify in the database what type the event belongs to. This field will be an integer to correspond to the ID field in the corresponding event type table which we will create after this one is done. So, when we create this event type id column, we define the database data type as an integer, and we will do the HTML type as a text.
I’ve got here a handy table for the commands we’re using to create these tables, as well as the validations for them, if any. As well as a screenshot of all the commands typed up to now.
| Command: | Validations: |
| title string text | required |
| date date date | required |
| start_time time date | required |
| end_time time date | required |
| body text textarea | none |
| event_type_id integer text | required |
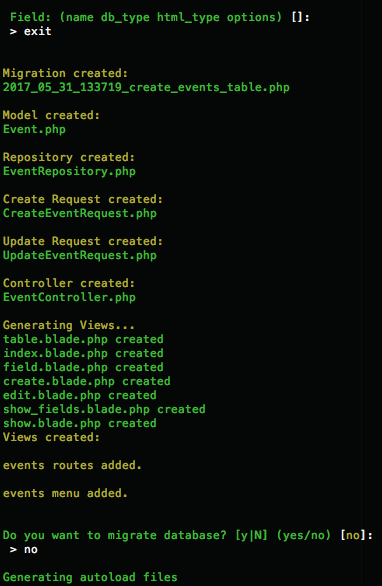
Now, because this is the final column, we’ll type exit to indicate we’re done with the scaffold generator, and then it will show how it’s generated all the files and stuff, and ask you if you want to migrate to the database. That’s up to you if you want to do it right now, or make some changes and do it later; but you’ll have to do it anyway to continue this tutorial.
So, here you are with a whole host of files that right now, can simply take data that you input in the create view, shove it into the database, and then display the data in the index/show views.
In part 2, we will take a look at creating the second table for event types, and setting up a relation between these two tables to get our filtering done, as well as assigning each event a type.
Last updated: April 16, 2024