We’re going to show you how to create a Vue Storefront Module, we’ll ease you in by creating a small module that wraps a customer messaging platform called Intercom.
Modules in Vue Storefront
Vue Storefront prefers to have features and functionality split up into “modules”. Each module contains the code & assets required to handle each standalone feature. Our intercom module that we’re going to create in this tutorial will also be a module.
The following examples are good examples to get your head around what would be classed as a module in Vue Storefront; cart, wishlist, reviews and newsletter. Soon to be, intercom too 
Getting started
In this guide, we’re going to assume you already have Vue Storefront locally ready to use – If not, you can find the relevant installation and configuration docs here.
Module structure
Inside your src/modules folder you should see a folder named module-template. If this doesn’t exist you can download it from here.
This folder has scaffolded majority of what you would need as a good starting point when creating a new module, it has the following aspects scaffolded and ready for you to start extending:
– Module registration (/index.ts)
– Basic Component (/components/ExtensionComponent.ts)
– Before & After module registration hook (/hooks)
– Basic Page (/pages/ExtensionPage.vue)
– GraphQL/ES query (/queries/exampleQuery.ts)
– Before & After router hook (/router)
– Vuex Datastore, with actions, getters, mutations ect (/store)
– Datastore Types (/types/ExampleState.ts)
You’ll notice that many of these module files are written in TypeScript, this is handy as it means your newly created module should be compatible with future versions of VSF as they implement more of their TypeScript Action Plan.
Now you have an overview of what is contained in a basic module, you can quickly start creating modules using the “out the box” module-template module. Simply remove what you don’t want, and extend what files you do need, to suit your needs. For more information on what the module-template has scaffolded for you, and more depth on how each part interacts with your VSF, you can have a look at this link here. It also includes some extra aspects like the Hepers and Tests folders.
However, this guide is aimed at diving straight in and getting a basic module for Vue Storefront up and running, with as minimum requirements as possible, it’s ideal to always start off small to get a decent understanding of how things like this work, so let’s crack on with this.
Copying the base module
We will copy the module-template we outlined above, as this already includes majority of what we need, all the parts of the module are already interconnected together and can strip down the parts of the module that we don’t need, this will help us create a working Intercom module very quickly.
Copy the src/modules/module-template folder to src/modules/intercom
Module requirements
We’ll have to gather our module requirements to know what parts of the base module to keep, and what to remove. To do this, we have to know a little more on how to integrate Intercom in general to any website.
We know that to integrate Intercom, their official documentation provide us with a script to load Intercom on your website, it explains to use this along with your unique Intercom “app_id”. You can use an additional script that is tailored towards PWA’s to keep Intercom updated with route changes. So you’ll always know what page the customer is on, allowing you to help them more accurately. As Vue Storefront is a PWA, we’ll use this script too.
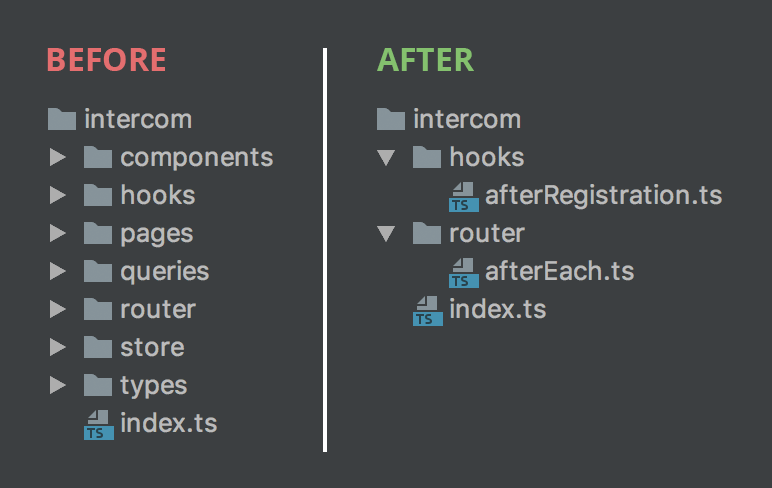
From these requirements, we now know what functionality and parts of the module we’ll need to keep in our newly created module folder. The rest of the files in the module will be obsolete, the files and references can be safely removed.
Here are the parts of the base module that we need to keep:
– Module registration file (/index.ts) – This is required for any module in Vue Storefront, it allows the application to understand how our module is intended to work.
– After Router hook (/router/afterEach.ts) – This allows us to listen to our PWA page/router changes, so we can update Intercom with this information.
– After module registration hook (/hooks/afterRegistration.ts) – This allows us to listen to when our module is successfully registered in our Vue Storefront application and can then add our official Intercrom provided script.
As you can see, in keeping with this guide to help you create a working, functional new VSF module as simple as possible, we’ve kept the module requirements low, and focus only on what we need for our Intercom integration to work successfully.
Our module folder will now look like the following:
After Router hook (/router/afterEach.ts)
The /router/afterEach.ts file is where we are going to send the updates to Intercom, keeping the customers state up to date. We can add our official script that Intercom has provided us, to send some PWA related route updates. This will run every time the page or route changes.
After module registration hook
We can add the official Intercom base script inside the/hooks/afterRegistration.ts file. This is a good place to put it because you have access to your Vue Storefront config, allowing you to check some parameters in there is valid, then in our case, if it’s valid, then we inject the Intercom script onto the page.
import { Logger } from '@vue-storefront/core/lib/logger'

// This function will be fired both on server and client side context after registering other parts of the module
declare global {
  interface Window { Intercom: any; }
}

export function afterRegistration({ Vue, config, store, isServer }): any {

  if( !config.intercom || !config.intercom.app_id ) {

    Logger.warn('No intercom config or intercom app_id found.', 'Intercom')();
    return;

  }

  var intercomAppId = config.intercom.app_id;

  this.onIntercomLoaded = (): void => {

    setTimeout(() => {

      window.Intercom = window.Intercom || { };

      // Boot Intercom with your app config.
      window.Intercom("boot", {
        app_id: intercomAppId
      });

    }, 1);

  }

  if (!isServer) {

    var head = document.head;
    var script = document.createElement('script');
    script.type = 'text/javascript';
    script.innerHTML = `(function(){ var w=window;var ic=w.Intercom;if(typeof ic==="function"){ ic('reattach_activator');ic('update',w.intercomSettings);}else{ var d=document;var i=function(){ i.c(arguments);};i.q=[];i.c=function(args){ i.q.push(args);};w.Intercom=i;var l=function(){ var s=d.createElement('script');s.type='text/javascript';s.async=true;s.src='https://widget.intercom.io/widget/${ intercomAppId}';var x=d.getElementsByTagName('script')[0];x.parentNode.insertBefore(s,x);};if(w.attachEvent){ w.attachEvent('onload',l);}else{ w.addEventListener('load',l,false);}}})()`

    script.onload = this.onIntercomLoaded();

    head.appendChild(script);

  }

}
Module Registration file
We now just need to alter the /index.ts file to reflect the changes in our module. We can remove the before hooks, and make the datastore obsolete.
import { afterRegistration } from "./hooks/afterRegistration";
import { createModule } from "@vue-storefront/core/lib/module";
import { afterEach } from "./router/afterEach";

const store = {
  namespaced: true,
  state: {
    key: null
  }
};

export const KEY = "intercom";
export const Intercom = createModule({
  key: KEY,
  store: { modules: [{ key: KEY, module: store }] },
  afterRegistration,
  router: { afterEach }
});
Intercom Config
Now all that’s left is to add some JSON to our Vue Storefront configuration files, usually the file you want to edit is /config/local.json – inside here we can add the following JSON.
Replace the app_id parameter with the App ID provided by Intercom. You can find your Intercom App ID here: https://www.intercom.com/help/faqs-and-troubleshooting/getting-set-up/where-can-i-find-my-workspace-id-app-id. Setting app_id to false will disable the intercom module at runtime.
Valid app_id example: “app_id”: “e8y21262”
"intercom": {
  "app_id": false
}
Register the Intercom module
Open up your /src/modules/index.ts and add the following code. Adding it inside this file the registers the module so it can be used in your Vue Storefront.
import { Intercom } from './intercom'
...
export const registerModules: VueStorefrontModule[] = [
...
Intercom
...
]
Run your watcher using yarn dev and then your new module should be ready!
Tada!
And that’s it! As you can see, it’s pretty easy to hit the ground running with creating Modules in Vue Storefront, the team have done a great job with providing a great base module for you to extend however you wish.
This guide provides you with a working Intercom integration module for VSF, allowing you to improve, or play about with it – to improve your knowledge of Modules in Vue Storefront a little better. For more information on Vue Storefront Modules, and the behind the scenes information on Modules, you can visit the official docs here.
We have a Github repository for this module, that you can compare your module code to, or install to your own Vue Storefront installation if you desire. https://github.com/develodesign/vsf-interco
Need more help from experienced specialists?
Mike Sheward
Technical Director
Mike is our Technical Director who has worked on eCommerce projects since 2014 and has been with Develo since 2015. He became certified in Adobe Commerce in 2023. Mike’s favourite aspect of web development is tackling intricate eCommerce challenges with the bespoke platform Magento/Hyvä, and he tells us his best achievement from working at Develo is fostering a culture of growth and innovation within our team. Outside of work, he can be found spending time with his family, baking and walking his dogs.
Develo is a leading Magento agency and eCommerce web development company based in Birmingham, in the UK, serving clients globally since 2010. We provide our Learn articles to share knowledge of magento web development, web app development and more to the wider web developer community. To extend your team with our white label web developers, collaborate or consult with us on your project contact us here.