


April 29, 2024
What is Google Tag Manager?
GTM is a lesser known tool than Google Analytics, but equally powerful. It allows you to easily install "tags" on your website. Tags can perform various actions, but they are often used for tracking customer activity.
What are we going to use it for?
We're going to use it to track which links customers are clicking on your website. A typical use-case for this is to determine how customers are interacting with your site navigation.
What tools do I need?
The only tools you need installed on your website are Google Tag Manager and Google Analytics 4, which are both free.


Sounds great! How do I get started?
Tags perform an action, such as recording customer clicks in Google Analytics 4. But you also need a "trigger", which tells the tag when to fire.
Step 1: Setting up a trigger
Within GTM, click Triggers from the sidebar, click New, and give your trigger a descriptive name.
Select Click - Just Links as the Trigger Type.
In the section titled “This trigger fires on”, select All Link Clicks.
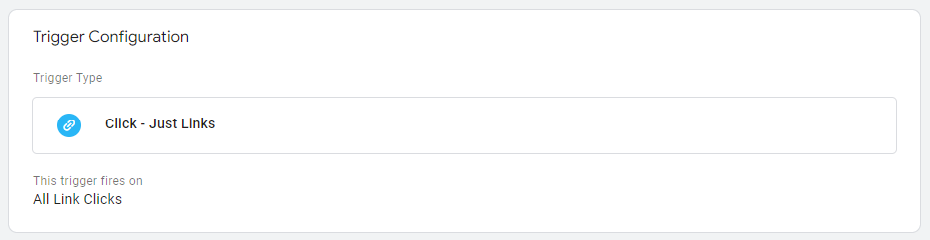
Save your trigger.
Step 2: Setting up a tag
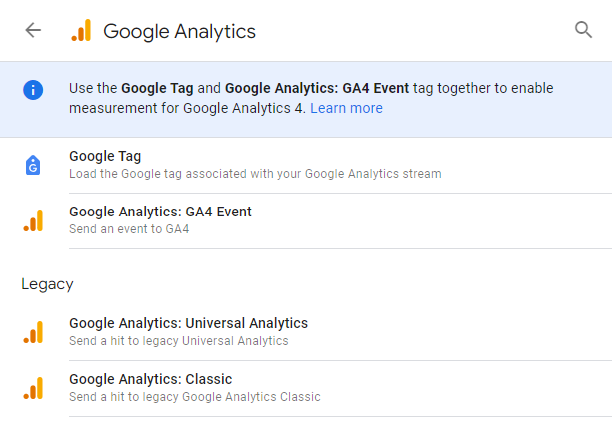
Next, click Tag from the sidebar and click New.
Select Google Analytics and then Google Analytics: GA4 Event.
Now give your tag a descriptive name.
Enter your Google Analytics 4 Measurement ID in the Measurement ID box, and enter a name for your event in the box below. We’ve chosen user_clicks but this can be anything you like. However, we advise using underscores to separate words.
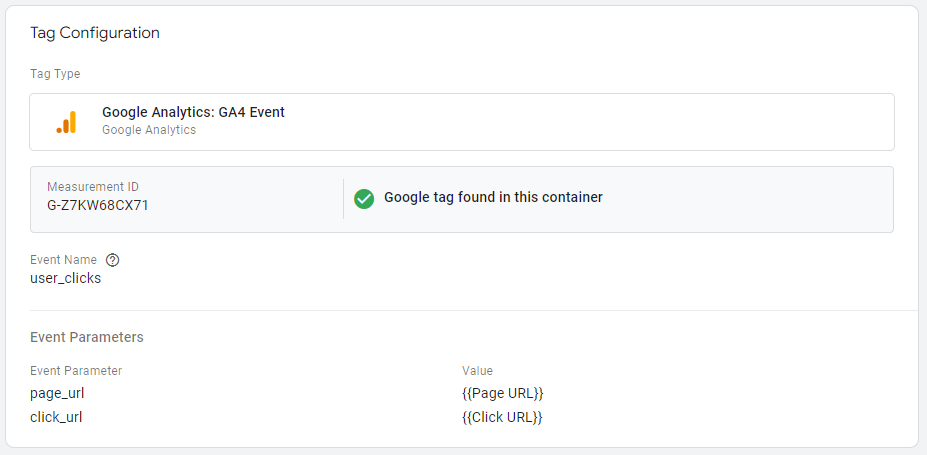
We now need to add some data to the event, so open up the Event Parameters section and click Add Parameter. Give your Event Parameter a name. Again, this can be anything you like, but we recommend using underscores to separate words here too. Now select a Value by clicking the icon which looks like a brick with a plus symbol on it. This opens a list which contains a number of pre-configured values. We’ve selected Page URL, which tells us the page the customer was on when they clicked a link, and Click URL, which tells us the link the customer clicked.
Finally, in the triggering section, click the pen icon and select the trigger we configured a few minutes ago.
Save your tag.
Step 3: Publish your changes
To start sending information to Google Analytics 4, you need to publish the tag and trigger to your website. To do this, click Submit in the top right corner, then enter a descriptive name in the Version Name box and click Publish.
Voila!
Summary
Within 24 hours event data should start appearing in Google Analytics 4, which can be accessed alongside the other default events that GA4 tracks. The new event will give you a deeper understanding of how customers are interacting with your website.
Last updated: January 20, 2026