This is part 2 of the Infyom Laravel Generator tutorial which was started here. I very strongly recommend going through that before continuing on here.
So, we’ve got an events table. Now we need to create an event types table so we can filter the table based on what event type has been selected. What this will include is a new table for the event types, a relation between the events table and the event types table, and allowing for event types to be assigned to each event.
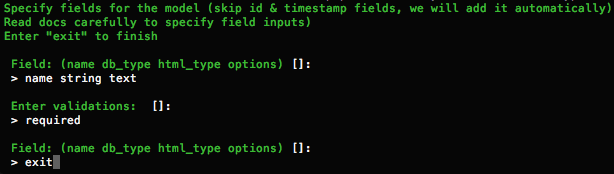
What we need to do here is the generating of the scaffold again. And to do that, we get ourselves in our terminal window, inside the project folder root, and we run the command php artisan infyom:scaffold , followed by the name of our model. So in this case, we’ll type in php artisan infyom:scaffold EventType and this will create the scaffold for the event types table; including the model, controller, migration and blade template. The only field we need for this one is name, as that is the data that will be used to bind to the event, and to filter the events.
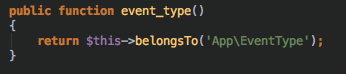
The first thing we need to do is set up a belongsTo relationship in the Event model, to indicate that the Event table is linked to the EventType table.
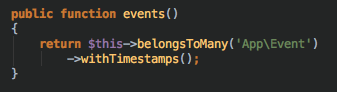
Then we need to set up a belongsToMany relationship in the EventType model, linking it to the Event table, as well as setting it to also link the timestamps.
A pivot table serves as a bridge between the two models and helps assign the fields between both models so that the data can be read/written to and from one another. Here, we use a pivot table that can transfer data to/from the event types table to/from the event table. The fields it will transfer are the IDs of both the event type and the corresponding event in the events table. To do this, the pivot table needs fields for both of these, which will be called event_types_id , and events_id . With the migration set up for these two fields, there are some changes you’ll need to make to the migration before migrating; mainly being the reference to the id fields on each table. These are outlined in this screenshot:
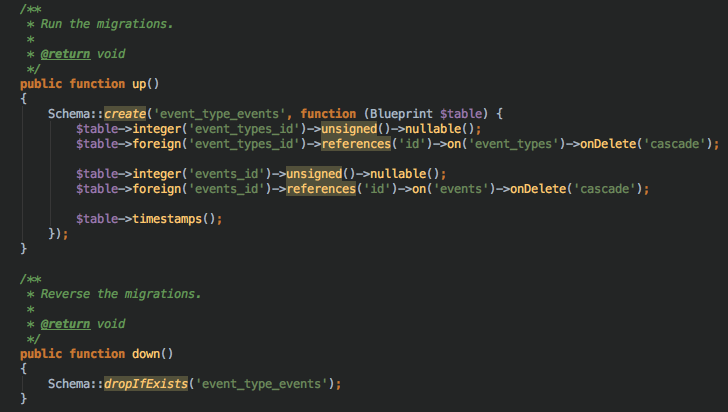
Here, the migration defines that the id field is unsigned and nullable as well as referencing the id fields corresponding to each table’s id field. The down function tells the migration to drop a table with the same name as the current one, if it already exists; so as to reset the data in the table to be cleared.
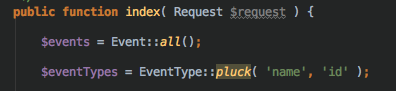
With this set up, you’ll need to go into the EventController and add the EventType model to the use section at the top, and then in the index function, create an $eventTypes variable and assign it to EventType::pluck( 'name', 'id' ); . These two columns are specified so that the name and id will be accessible from the event page view. Once doing this, you should add the eventTypes variable to the compact section in the return function.
This variable stores the names of the event types. Now that this is created, we can use this data on the events system to filter the events that are displayed; just by referencing the variable in the create view. This would allow for the event types to be available as an option when creating an event, so each event can be assigned an event type as one of the fields in the database events table.
You’ll want to create a form to add event types, and use that to create just the name of the event types. These event types will be stored in the event types table of the database, and then referenced in the event controller, so it can be called through the relationship declared in the event model.

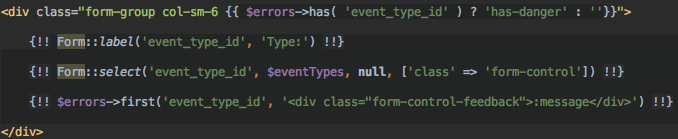
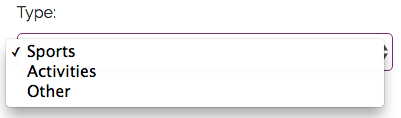
In the view with the form for creating an event, we can have a drop-down field with the event types defined in the event types form above as options, to assign them to the event. This would be done by referencing the $eventTypes variable when creating the select box. Then this would create the event and add the corresponding event type into the event type field in the events table in the database.
Extra QoL content:
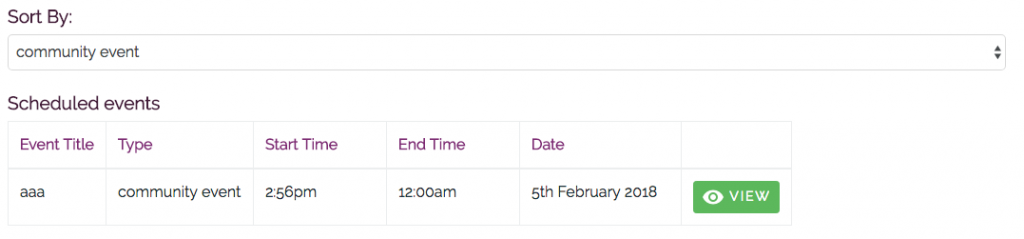
Once the events have been assigned a type, they can be filtered by the type. This can be done by adding a select box to the top of the page where the events are displayed; and then using the select box to select an event type, and then filter it by referencing a script that will only show the events that have the selected event type in the event types field.
![]()
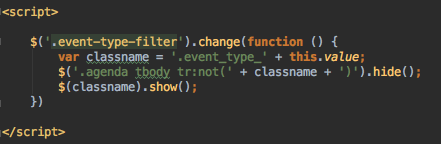
This will then, on selection of an event type, hide the events that aren’t the type that’s been selected. This example displays the events in a table, so the script references the table fields to hide them (‘.agenda, tbody, tr’).
Now that we’ve got the data displaying on the front-end while also being able to filter the displayed data using the event type field, we will now tweak the events table on the front-end and set it to only show events past the current date. So as to only show the events that are upcoming, instead of listed all events including ones in the past. To do this, what we need to do is run a conditional statement that will check if the current date is less than or equal to the data in the date field of the events array. This is referenced by calling $event->date After checking if this condition is true, then the events are displayed.
![]()
This checks against the current date, but formats it with the filter ('Y-m-d') , to set that date to be the same format as the data in the date field of the events array. This is done to make sure both objects are of the same format so that both of them can be compared, to check if the event date is after the current date.